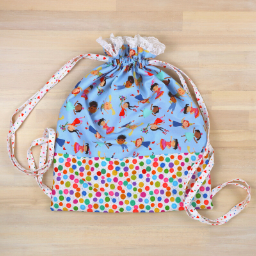
Follow this tutorial to sew a holiday gift bag for Christmas! Adding these adorable corners gives this simple fabric gift bag a cute look without too much extra work.
How to sew a holiday gift bag video tutorial:
This video tutorial walks you through everything you will see explained below.
*This post contains affiliate links
ITEMS NEEDED:
- 2 different designs of 100% Cotton Fabric
- Ribbon or Twill Tape
- Fabric Scissors or Cutting matt & Rotary Cutter
- Mini Pom Pom Trim or Lace or Ribbon for embellishments (optional)
- The obvious, Sewing Machine & Thread.
STEPS FOR HOW TO SEW A HOLIDAY GIFT BAG
- Large: Cut two pieces at 12″ by 15″ – and two at 6″ by 6″
- Medium: Cut two pieces at 10″ by 13″ – and two at 5″ by 5″
- Small: Cut two pieces at 8″ by 11″ – and two at 4″ by 4″
STEP 1: CUT OUT THE FABRIC

Cut two sections of the gift bag fabric at 12″ by 15″

Cut out two squares at 6″ by 6″. This will be for your gift bag corners.
Then take both squares and cut corner to corner to create 4 triangles.
STEP 2: Iron Both Large Pieces
Take the two large pieces of fabric (12″ by 15″) and iron a 1/4″ seam across the top of both of these pieces.
I like to use a sewing gauge to help me as I iron this seam.

But taking a piece of card stock and marking the 1/4″ seam along it can help guide you as well. OR you can buy this Hot Ruler that will do the same thing without warping!
STEP 3: Iron the Triangles
Iron a 1/4″ seam along the long edge of all four triangles. Since these pieces are smaller the Hot Ruler can really come in handy.
STEP 4: Sew Along the Tops

Sew along the edge of both 1/4″ folds on the 12″ by 15″ pieces of fabric.
STEP 5: Clip & Pin the Triangles

Lay the large pieces of fabric right side up with the ironed portion at the top.
Then lay the triangle pieces on top of the large fabric pieces on both bottom corners.
I like to use these sewing clips to secure them to each corner.
STEP 6: Add Embellishments
At this point if you want to add some cute Pom Pom Trim or Lace Ribbon you would cut strips long enough to tuck under the ironed portion of you triangles. Then pin along these sections of the triangles securing the embellishments into place.
STEP 7: Attach the Triangles

Sew along the long section of all four triangles, securing them to the fabric.
With the added embellishments the Holiday Gift Bag will look like this:


STEP 8: Attach the Large Pieces Together

To attach the front and the back of this holiday gift bag together lay them right sides together.

Then measure 2.5″ (in the photo I did 2″ but found 2.5 gives a little more wiggle room) down from the top and mark along both sides.

Sew a 1/2″ seam starting at the first mark, going all the way around to the other mark.
STEP 9: Iron Both Side Seams Open

Take the gift bag to your ironing board and iron open both side seams flat. No need to iron down the entire side. We just need to press the section of fabric that hasn’t been sewn yet, open.
STEP 10: Sew Around Each Side Seam
Sew from the top down to where the side seams meet. Pivot the fabric, sew across, and then back up. Remember to back stitch this section.
(I forgot to do this step…so I don’t have a photo. In the video tutorial I will show this step)
STEP 11: Create the Casing

Fold both top sections down, wrong sides together so the edges meet the bottom of the open seam.

Pin in place and sew along the edge of both folds creating your casing. I like to follow the previous seam from the quarter inch seam you sewed at the beginning.
STEP 11: Clip those Corners

Clip along both inside corners before turning right side out. This helps reduce bulk.
STEP 12: Add the Ribbon!

Cut two sections of Ribbon or Twill tape at 30″ each.
Then attach a safety pin to your ribbon/twill tape and feed it through both sides of the casing. Do this with the second ribbon going in the opposite direction and you have finished sewing your holiday gift bag with added corners!
Leave me a comment down below with any questions you may have or ideas to share! I am always looking for new ideas and would love to hear from you.
To Sew a Gift Bag with Lining check out THIS POST.
PLEASE Share this photo on Pinterest to help inspire others 🙂

This tutorial was featured in the Holiday Issue of Beginner Sewing Magazine as well as on their website.