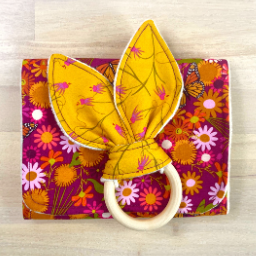
This step by step Tutorial will walk you through everything you need to know to make a rag quilt for beginners. So many people think rag quilts are only for babies but this easy sewing project can be made any size for anyone! https://youtu.be/Fia6ApOPBIw
Watch the Video Tutorial HERE:

Follow these steps for how to make a rag quilt for beginners!
For more ways to make a rag quilt using different techniques, patterns and fabrics check out this blog post.
This post contains affiliate links at no cost to you. I appreciate the support!
Rag Quilt Tutorial Starts Here:
Step 1: Cut fabric into squares for your rag quilt

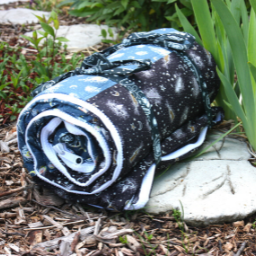
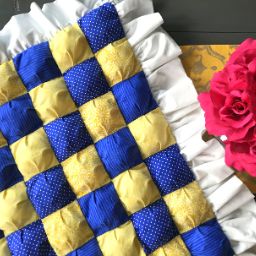
For the case of this tutorial we will make a rag quilt baby blanket with flannel fabric as it is soft and rags the nicest. This is a nice size for taking along in a stroller or laying on the floor for tummy time!
It will be 7 squares tall and 6 squares wide.
Cut all your fabric into 6 inch by 6 inch squares Using a Rotary Cutter, Quilting Ruler & Cutting Matt.
Cut the batting into 5 inch by 5 inch squares (batting is not needed but makes the rag quilt thicker & warmer.)
Step 2: Sandwich your fabric & sew

Take all your fabric and sandwich the batting in between, making sure that all your squares have the nice side of the fabric facing out.
My Favorite Batting is a natural cotton.
Then sew across each square to make an X from corner to corner to keep the batting in place when it goes through the wash. No need to back stitch this part.
If not using batting the squares will not need to be sewn together. But at this point match all squares up with the nice side of the fabric facing out.
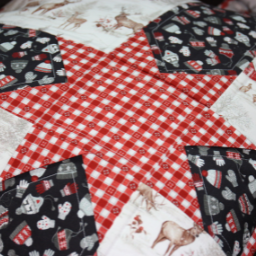
Step 3: Plan out your pattern

Line up your squares into 7 rows of 6. This is where you can play around with patterns to make your rag quilt original. You could make a checkerboard design or just scatter the different printed fabrics around so they don’t touch each other. Either way the rag quilt will turn out nice.
Step 4: Pin squares & sew the individual rows

Once you have your pattern planned out, pin the individual rows together making sure that the seams for all the squares are facing up.
Sew them together with a half inch seam allowance (You can do a one inch seam allowance but then cut your batting 4″ by 4″ and know that the blanket will end up a little smaller). No need to back stitch this part either.
The back of your blanket will have a flush look and the front of your blanket will have the rag quilt detail.

Number the rows 1 through 7, so you can go back and remember how your pattern was laid out. You can buy special numbered pins to make it easier.
Now sew individual rows together. Leaving you with 7 rows of fabric.
Step 5: Sew the rows together

Lay your rows back out and make sure they are in their correct order. Then pin two rows together making sure this new pinned seam is facing up.
We want the squares to line up. So when you match the seams together an easy way to pin them is to make one seam fold to the left and the other seam fold to the right. Preferably the top seam goes left so you can guide it through the sewing machine.

DO begin to back stitch at this step.
And do this with a half inch seam allowance.

Step 6: Sew around the edge
Finally, sew around the edge leaving a half inch edge to be ragged.
Don’t forget to back stitch!
Step 7: Time to cut all the raw edges!

This part is time consuming but soooooo worth it!
Cut all the open edges around half an inch apart or less.
The narrower your clips the nicer the ragging process will turn out.
Using a pair of scissors works, but believe me when I say YOUR HAND WILL HURT at the end of this tiny Rag Quilt Baby Blanket!
So may I suggest you try this awesome spring powered pair of rag quilting scissors? Your hand will thank me 😉
Step 8: Let’s rag this quilt

Time for the washing machine. This part is VITAL.
Run through the washing machine on a quick wash cycle (no soap needed), WITH other old towels. It will help keep the washer balanced but it will also make sure the washer doesn’t tear your quilt to shreds. (I use warm water unless I have a fabric I am concerned will bleed).

After the first wash take it outside and shake off the extra threads that have appeared. Then go for a second round in the washing machine (this is when I add soap to clean the fabric).
After this put your rag quilt it in the dryer with the old towels.
Check on the dryer half way through to empty the lint trap and shake out the towels and blanket before finishing the drying cycle.
These steps will make sure your washer and dryer continue to work the way they were made to.
Step 9: Revel in your accomplishment!

You did it! That is how to make a rag quilt for beginners!
Comment below if this was helpful OR if you have any other tips I may not know of. I love to hear other crafters tips and tricks.


Very helpful. I’m 79 and never made a quilt. Going to watch it again and go buy material.
I hope it goes well for you Nancy! Rag Quilts are the way to go when learning. All the ragging will hide any imperfections. And as you learn just remember, every quilt has an error. No one is perfect! Happy Sewing 🙂
How much fabric do you need?
This is my first time making a rag quilt
If you are doing a small baby rag quilt you could start with three different 1/2 yards of fabric. That will give you plenty of fabric to make your first one. After that you will begin to see how much is needed for what size. I must admit I have never figured out the actual amount I buy for these as I am often just buying half meters of fabrics I like and then adding them to my fabric stash for when I want to make some. Happy Sewing Janine!
When, exactly do I back stitch?
Hi Kathy, You can start backstitching when you start piecing the rows together and on your final stitch around the entire outer edge. Happy Sewing!
Hi love this tutorial! I have a question for you. I am totally new to sewing, but I have managed to make a couple of rag quilts. They turned out pretty good! I want to know if a rag quilt can be made using larger blocks or rectangles? say the size of a fat quarter? would it turn out ok? Thanks for any input you can give me as I am woefully uninformed when it comes to sewing and quilting.
Cat
Hi Cat, Yes you can make your squares larger or even do rectangle ones for sure! The only thing I would caution you with is the batting. It will lump up if it is not attached between the layers properly. So sewing the crisscrosses on them is important, especially if you choose to go larger. Hope that helps. Happy Sewing!
Loved your video! Thank you for sharing, going to my first quilting class next month and the first project is a rag quilt, I wanted to get a heads up on how they are maid, so thank you for all the information.