Learn to sew a drawstring backpack following one of these 4 sewing pattern ideas!
All four of these drawstring backpacks come with a video tutorial. The video will walk you through all the steps you need to know to sew your own drawstring backpack.
Watch the Video Tutorial HERE:

*This post contains affiliate links, if you shop through them I will make a small commission which allows me to continue to make these free tutorials for you. I appreciate your support.
As you sew one of these four drawstring backpacks you will see that each one gets just a tiny bit more complicated. BUT they are all still easy enough that any beginner sewer can pull this off!
As you sew these drawstring backpacks you will see the different additions and can mix and match what additions you want and don’t want in your backpack.
Version 1: Drawstring Backpack (Beginner Friendly)
This drawstring backpack is the only one of the 4 that does not have a lining. But what makes this one special is that is has a loop to hang your backpack.

You will need:
- 2 different cotton fabrics
- Rope (I like clothesline rope or cotton rope)
- Your usual sewing essentials
Cut List:
- Main backpack pieces cut at 18″ by 15″ (cut 2)
- Loop cut at 2″ by 6″ (cut 1)
- Bottom Tabs cut at 2″ by 3″ (cut 2)
Version 2: Drawstring Backpack With Lining
This drawstring backpack is almost the same as version 1, except that this one has a lining fabric but doesn’t have the added loop to hang the bag.

Another thing I do here is to cut only one piece of fabric for the outer and one piece for the lining. This means that you can not use directional fabric.
You will need:
- 2 different cotton fabrics (Non-directional)
- Rope (I like clothesline rope or cotton rope)
- your usual sewing essentials
Cut List:
- Outer Fabric cut at 15″ by 30″ (cut 1)
- Lining Fabric cut at 15″ by 35″ (cut 1)
- Bottom Tabs cut at 2″ by 3″ (cut 2) I used a third fabric for the tabs but you can also use the lining fabric as that will match the casing nicely.
Version 3: Drawstring Backpack with Rope Straps (Beginner/Intermediate)
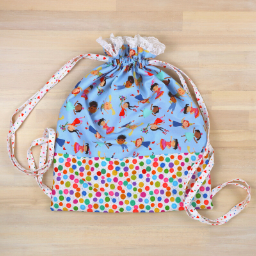
This drawstring backpack is the girliest of the three as we will add some lace along the top.

This bag will teach you how to make your own fabric straps instead of using rope.
You will need:
- 3 different cotton fabrics
- Lace (optional)
- Your usual sewing essentials
Cut List:
- Outer Fabric top piece cut at 12.5″ by 15″ (cut 2)
- Outer Fabric bottom piece cut at 6″ by 15″ (cut 2)
- Lining Fabric cut at 18″ by 15″ (cut 2)
- Lace, around 30″ worth
- Fabric straps cut at 2″ from selvage to selvage (cut 4)
- Your usual sewing essentials
Version 4: Drawstring Backpack (Beginner/Intermediate)
This version is the most complicated as you will be learning to add a pocket into the inside of your backpack.

You will also create a boxed bottom for the bag which is a great sewing skill to learn!
You will need:
- 3 different cotton fabrics
- Rope (I like clothesline rope or cotton rope)
- Your usual sewing essentials
Cut List:
- Outer Fabric pieces cut at 18″ by 15″ (cut 2)
- Lining Fabric pieces cut at 18″ by 15″ (cut 2)
- Casing Pieces cut at 15″ by 3″ (cut 2)
- Bottom Tabs & Loop at 2″ by 12″ (cut 1)
- Pocket cut at 6″ by 9″ (cut 1)
I hope you enjoy sewing one of these 4 drawstring backpacks! Leave me a note in the comments on which one is your favorite backpack! I always love to hear from you.
Please pin the below image to share this project with others. I appreciate your help in spreading the word!


I just made bag #1 with the loop. It worked out SO well! You’re directions are very easy to follow.
I am so glad to hear that Katie! Thanks for giving one of my tutorials a try 🙂
I have made the fourth drawstring bag many times. I make them for my local Christmas charity program. I love making them. Your YouTube tutorial is perfect!
I am so glad to hear that Sandra! Thank you!