Quilted Jackets have become quite popular over the years and seem to have exploded on Instagram! But how do you make a quilted Jacket?
10 Steps to making a Quilted Jacket:
There are two ways to go about making a quilted jacket. The first is with a lining and the second is without.
WATCH THE YOUTUBE TUTORIAL HERE
*This post contains some affiliate links at no cost to you.
Step 1: Decide what method you will use to make your quilted jacket:
Quilted Jacket Method #1: No Lining

The first way to make a quilted jacket is by starting with a completed quilt. One that has a top, middle and back to the quilt.
Some people like to repurpose old quilts (but SERIOUSLY, don’t anger the quilting community by cutting up an important quilt! Make sure it isn’t an antique first.)
Or just make your own quilted panels specifically to cut up into your quilted jacket.
These quilts are perfect to turn into jackets without linings as the back fabric on the quilt becomes the lining.
Making your quilted jacket using this method means you will end up with the quilted edges exposed along the neck line, arm holes, edges of the jacket as well as the seams inside the jacket.
To cover up all these ugly seams up you will add binding/bias tape to them.
This finishes the look quite nicely!
Quilted Jacket Method #2: Jacket with Lining

If you would rather have a quilted jacket without the binding look then Method #2 is for you!
This second method will allow you to add a lining to your coat.
Because the lining will cover up all the ugly seams within the coat as well as help to finish the outer edges without binding, you will only need to make panels using a quilt top and some low loft batting.
Step 2: Choosing the right pattern for your Quilted Jacket
Unlined Jacket Patterns:

- Tamarack Jacket by Grainline Studios
- Grainger Coat by Muna and Broad (plus size)
- Small Dream Factory (Free Toddler Pattern, great for a practice run. However add the arms to the front and back before doing the side seam instead of what the instructions suggest)
- Simplicity 8298
- New Look 6585
- Style Arc Loren Jacket (Blazer)
- Lilliana 3070 by Seamwork, (Short Blazer)
- Simplicity Vintage US1499U5 (Outdoor Vest)
Lined Jacket Patterns:

- Waver Jacket by Papercut Patterns (this is the one I used, but omitted the waist casing & Stabilizer) THEY STOPPED SELLING IT. But I suggest emailing them and asking for it anyways as it is a PDF download.
- Simplicity 1254
- McCall’s M5162
- Kwik-Sew K4012 (Childs Size)
- Easton Jacket 3146 by Seamwork
- Nova Coat by Papercut Patterns (this one is popular on instagram however the arms end up looking stiff in my opinion)
Step 3: What to Avoid in a Jacket Pattern:
- Do not go for a jacket pattern that has too many details as the quilt can hide those features.
- Do not choose a pattern that looks like it drapes and flows as quilt fabric is stiff and will not “fall nicely”
Step 4: Consider a Test Run
After doing all that work creating panels for your jacket the last thing you want is for the pattern not to fit correctly.
Consider doing a test run with cheap fabric to see if you like the fit.
Step 5: Buying Fabric for your Quilted Jacket

If your jacket pattern is not made specifically for a quilted jacket then consider what you will need above what the pattern calls for.
- You will need batting, I used a low loft batting, however if you want it to be warmer consider a wool lining or even an insulated lining.
- You may need backing fabric if you are not doing a lining.
- It is unlikely you will need any stabilizers, fusible or interfacing that the jacket pattern may call for as the quilted panels tend to be stiff enough.
- Buy a LOT more fabric then the pattern calls for if you are doing a patchwork quilted jacket.
- Prewash your fabric in cold, but do not prewash the batting.
For my patchwork quilted jacket I used 15 different fabrics and bought a quarter of fabric for each one. But you could use as many fabrics as you would like. The more the merrier!
I also bought 2 meters of one of my fabrics so I could do the sleeves and hood quilted in one single fabric.
For the lining I used fabric I already had, and I am still looking for the perfect buttons!
Step 6: Making the Quilted Panels

To make your panels you will first sew together the quilt tops.
Do this however you wish. You can use squares, quilt patterns, or just quilt over a solid piece of fabric.
Consider how your patterns will line up when making these panels.
Remember patterns are often cut with mirrored images, keep this in mind when making the quilted panels for your quilted jacket.
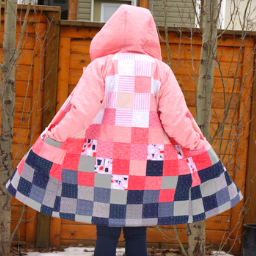
How I made my Patchwork Ombre Quilted Jacket:

- Cut squares at 4″ by 4″ for a modern look.
- layed out the squares into a pattern I liked.
- Pieced the squares together using a quarter inch seam and my quarter inch sewing foot.
- Ironed the seams open.
- Made 2 large panels for the front and back of the jacket and 2 smaller panels for the pockets.
- The hood and sleeves were also made with 3 panels of solid fabric attached to batting.
Step 7: Basting/Quilting your Panels

Before basting make sure you cut your batting and backing (if you are using a backing) an inch or two larger then the quilt top. This helps as the quilt top will naturally shift a little when sewing.
There are two ways you can baste your quilted panels before sewing:
- Baste spray
- Basting pins (this is my prefered method)
Baste the layers together using a lot of pins or the basting spray.
This keeps your top from shifting too much while sewing.
Lengthen your stitch length a little bit as well so the quilting has a nicer look to it.
To Sew the layers together use a walking foot.
Step 8: Cutting the Panels

Once your panels have been sewn together it is time to start cutting out the pattern pieces for the quilted jacket.
To do this remember to line up the quilted seams so the jacket pieces line up nicely.

Consider smaller pieces like the pockets. They may need to be made later to make sure they match up to the jacket front properly.
When cutting my quilted coat I lined the bottom up along the bottom panels to make sure my Ombre effect matched up from the front to the back.
Step 9: Sewing the Quilted Jacket Together

This step is best done by following your particular pattern instructions.
However here are some tips:
- Use a Jean needle as you are sewing through a lot of layers.
- Depending on the area of the jacket it can help to trim away some of the excess bulk after sewing. But don’t compromise the jackets structure.
- If you are doing a lining there is no need to press your seams open.
- Extra top stitching in certain areas may help the jacket have a crisper look.
- Use a lining fabric for the arms as it will be more comfortable.
- Omit extra details the jacket calls for if the quilting makes it difficult. Things like waste casings & fusible.
Step 10: You have learned How to make a Quilted Jacket!

It is time to enjoy the fruits of your labor and wear that quilted jacket with pride!!!
Please share this post by pinning the below image. Thank you!




Very fun Tamara !! I have made a lot of your face mask s 👍👌
Thank you Aileen! I really do love it. And I am glad the facemasks helped too! Hopefully one day sooner then later we can gather together again. Have a Merry Christmas!
Thanks for this how to!! I’m gonna try and make this as a surprise for my sister in law! ❤️
That would be an amazing gift!!! Hope it all goes well 🙂
Nice! I’m all into patchwork clothes at the moment!
I made a similar coat some years ago but I made it as a sampler quilt in USA colours, red, white and blue. AndI tossed in some gold just for the fun of it. I see that people stare at it but… I’m from Stockholm , Sweden and no one would pretend the’ve noticed it.
I’m not in any social media but I can mail you a picture of if you like. You can spread it out to others.
There should be more quilt coates in the world!
best regs Eva
Wow! That coat sounds amazing! I would love to see it!! My email is Create@tamarasjoy.com if you would like to send it to me. Are you going to make another one? I am from Canada, so I have been waiting for warmer weather to wear mine lol!
How do you think upholstery fabric would work? Too heavy? I have a bunch of upholstery samples that I would love to make a patchwork coat out of!
Since other coats have been made with thicker fabric I don’t see why you couldn’t do upholstery fabric for a coat. The only problem I could see is all the extra seams creating bulk. So maybe sewing them in strips instead of squares could help lessen the amount of seams created? I hope it works for you!
thank you tamara for taking the time and energy to make the blog. it has helped me a lot.
You are welcome Penny! I am so glad it has helped. It took me a lot to figure things out and I wanted to share the process so others didn’t have to be as confused as I was when I started lol!
I just watched your YouTube video on making this jacket.
The link to Britney Frey etsy shop is no longer valid.
I would like to find the pattern you used, it looks exactly like what I am looking for.
Also a plus size friend of mine wants me to make her a jacket and you commented that this one ran big by two sizes,
When I make a jacket, or wedding gown I always make the pattern up in muslin first and make any necessary adjustments on that. I have made one now for myself but this pattern does not have a hood.
Hi Anne, I believe Britney uses her own website now: https://sewmuchfab.com/. And the pattern I used is discontinued. But I have linked to many other options above that I hope will help you find your way to the right coat for you. Some are also plus size. The Nova Coat (Used to be called Sapporo Coat) is the one I believe Britney used to make her first coat and then she added her own hood to her pattern.
In the blog, I see a “download PDF” option. Is this for downloading the pattern for the quilted jacket? Just wanted to make sure before I click on something that might be nefarious. Thanks!
Hi Leslie,
I double checked and didn’t see anything in the post about a download PDF. There are a lot of links in this post that you can click on that will bring you to different coat patterns. Most you will need to purchase. Sadly the coat pattern I used for my tutorial no longer is available for purchase. But don’t let that stop you! You can do this 🙂
Tamara, I have a question about the quilted jacket. I am making one and am using the same pattern you used. I chose a fuzzy lining fabric and am quilting it directly to the patchwork exterior. I messed up and cut the lining as lining, not the same as the exterior. What suggestions do you have for the front closure of the jacket? Thanks!