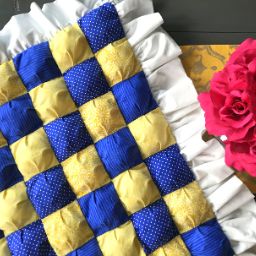
This is an easy mitered corner placemats sewing tutorial that is a perfect sewing project for beginners.

*This post contains affiliate links, As an Amazon Influencer, I earn from qualifying purchases. If you shop through them I will make a small commission which allows me to continue to make these free tutorials for you. I appreciate your support.
This sewing tutorial will give you enough fabric to sew 4 placemats. Cut the fabric following this video tutorial so you end up with 4 placemats in total.

Mitered Corner Placemat Tutorial
You Will Need:
- Cotton Fabric for the back, buy 1 yard
- Cotton Fabric for the front, buy 3/4 yard
- Thin Quilters Batting for the middle, depending on the width of the batting you may only need to buy 1/2 a yard. But make sure it is at least 72″ wide if you only by 1/2 a yard. You will need to cut 4, 13″ by 18″ rectangles from this batting.
- Pins or Quilting Pins or 505 Basting Spray
- Frixion Pen or Water Soluble Marking Tool.
- I do recommend using a Sewing Stiletto to keep your fingers clear from the sewing needle.
Cut List:
- Cut batting at 13″ by 18″ (Cut 4)
- Cut front fabric at 13″ by 18″ (Cut 4)
- Cut back fabric at 16.5″ by 21.5″ (Cut 4)
Watch the Video Tutorial HERE:
Follow this easy mitered corner placemat tutorial HERE to put this project together. I try my best to not waste your time, but teach you all you need to know.

For another fun beginners sewing tutorial check out this pin banner sewing tutorial as it would also make a great kids gift. And Happy Sewing!


Love this pattern BUT as a new sewer I am stuck on the mitered corner. Are you lining up your 45 degree with the sew line from quilting? Because that doesn’t seem to line up correctly? OR does the 45 degree line up along edges of the quilted piece-which seems right but is not aligned with sewing line of quilted piece?